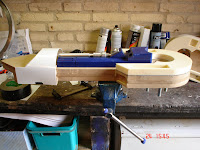
Using a car screen wiper motor, that I totally wrecked, I tried to make a dome drive system. I used a rubber wheel and a wooden frame. I hooked it on the rods that are supporting the frame, attached a spring to it and made sure that it did make good contact with the rockler bearing. It worked! Unfortunately the axle of the motor was threaded ( like a screw ) and therefore the wheel was not entirely vertical. SO I took the assy out and wil try something else.
What did work was the RC unit I took from a RC car. It has a transmitter and receiver, 12V batterypack and 2 relais. I will be using this for the feet driving, to play with, untill I will buy more robust and professional equipment.
Later!
Thursday, February 28, 2008
Continuing story of the legs
Dome painted


Well, I painted the acryllic dome. That was quite a job. Being plastic, I had to use special primer first. Then I was to quick with spraying the colors. The grey color went ok, but the blue started to blend in with the primer. So I primed it again, let it rest for a day and then sprayed the blue, over and over again. I'm quite happy with the result. Hack, this is a trial project anyway!
Sunday, January 13, 2008
Started with the dome
The choice for a dome was not easy. But, smart as I am, I thought, let's start with a cheap version, as I will probably make mistakes in t he beginning. So I ordered the Aspect birddome, and started with the drawing and cutting out of the panels.
The drawing was rather easy, just put a screw in the hole on the top, put a strip of thin material ( styrene, paper ) along the dome, take the measures from the official blueprints, make a hole in the strip, put the pencil in and draw the lines around the dome ( sounds a lot easier than it actually was ). But the result is rather ok. 

Friday, January 4, 2008
Frame
The frame I bought from Andy Schwartz, and is the styrene A&A frame. A&A stands for Andy and Alex ( Kung ). They offer all kind of parts to the club. It comes with a complete PDF tutorial, so it is quite simple to assemble. Here you see the assembled frame with the front inner skin on ( test-fit ).
To strengthen the frame a bit I put M6 threaded rods on several places through the frame. Be sure to countersink the holes as pointed out in the tutorial!
To strengthen the frame a bit I put M6 threaded rods on several places through the frame. Be sure to countersink the holes as pointed out in the tutorial!
Index
Intro
Body:
- Frame
- Skin
- Separate parts
Dome:
- Aspect clear dome
- Rockler bearing
- Separate parts
- Electronics
- Painting
Legs:
- Wooden legs
- Separate parts
- Painting
Feet:
- Outer feet
- Inner foot
- Battery Boxes
- Motors
- Wheels
Materials used:
- Plywood
- Acryl
- Styrene
Tools used:
- Dremel
- Drawing ruler
- Sandpaper
- Drilling machines
- Sawing machines
Intro
Well, it all started in januari 2006. I was reading "KIJK" magazine, which covers all new scientific stuff. They mentionend the R2Buildersclub, where people actually build R2D2's, exchange idea's, parts, photo's, etc about the little Starwars Droid. I immediately was interested and started gathering info, drawings, parts etc.
I will handle the different parts seperately, and hope I remember what I've done, since it's already a 2 year activity!
I will handle the different parts seperately, and hope I remember what I've done, since it's already a 2 year activity!
Subscribe to:
Comments (Atom)


